> ## Documentation Index
> Fetch the complete documentation index at: https://docs.starfort.io/llms.txt
> Use this file to discover all available pages before exploring further.
# Guardian 등록
> 프로젝트에서 Guardian을 생성합니다: 이름 지정, Input Types 선택, 프리셋 선택.
[Guardian](/ko/v1.2/concepts/guardian)은 프로젝트에서 콘텐츠를 검사하는 주체입니다. Guardian을 등록하면 System Guardian 프리셋으로부터 **Project Guardian**이 생성됩니다.
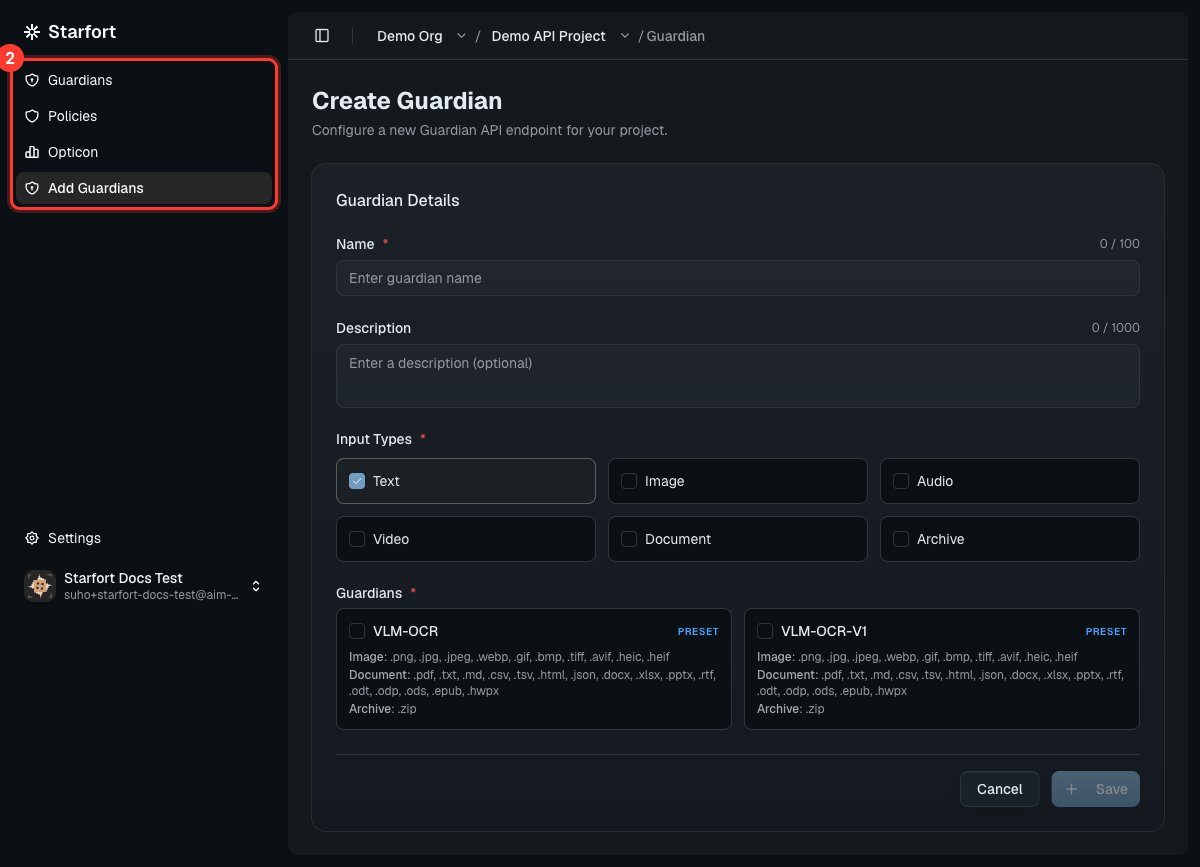
## Guardian 생성
등록에는 **네 개의 필수 필드**만 필요합니다 — 나머지는 모두 선택한 프리셋으로부터 자동으로 채워지며, Guardian은 (별도의 활성화 단계 없이) **즉시 활성** 상태가 됩니다. 프로젝트에서 **Create Guardian**을 선택하고 다음을 입력합니다:
이 Guardian을 식별하는 이름입니다. 이름은 **프로젝트 내에서 고유**해야 합니다 — [Opticon](/ko/v1.2/admin/monitoring-opticon)에서 트레이스 이름으로 사용됩니다.
검사할 콘텐츠 종류를 활성화합니다 — Text, Image, Audio, Video, Document, Archive(최소 하나).
Input Types를 선택한 후 **VLM-OCR**과 같은 프리셋을 선택합니다. 선택한 **모든** Input Types를 지원하는 프리셋만 표시됩니다. **Desktop Agent** 프로젝트에서는 Desktop Agent 호환 프리셋만 표시됩니다.
Guardian이 생성되고 해당 **How to use** 페이지로 이동합니다 — 키(API)와 정책을 갖추면 바로 호출할 수 있습니다.
 하나의 프로젝트는 각기 다른 프리셋을 사용하는 **여러 Guardian**을 가질 수 있습니다.
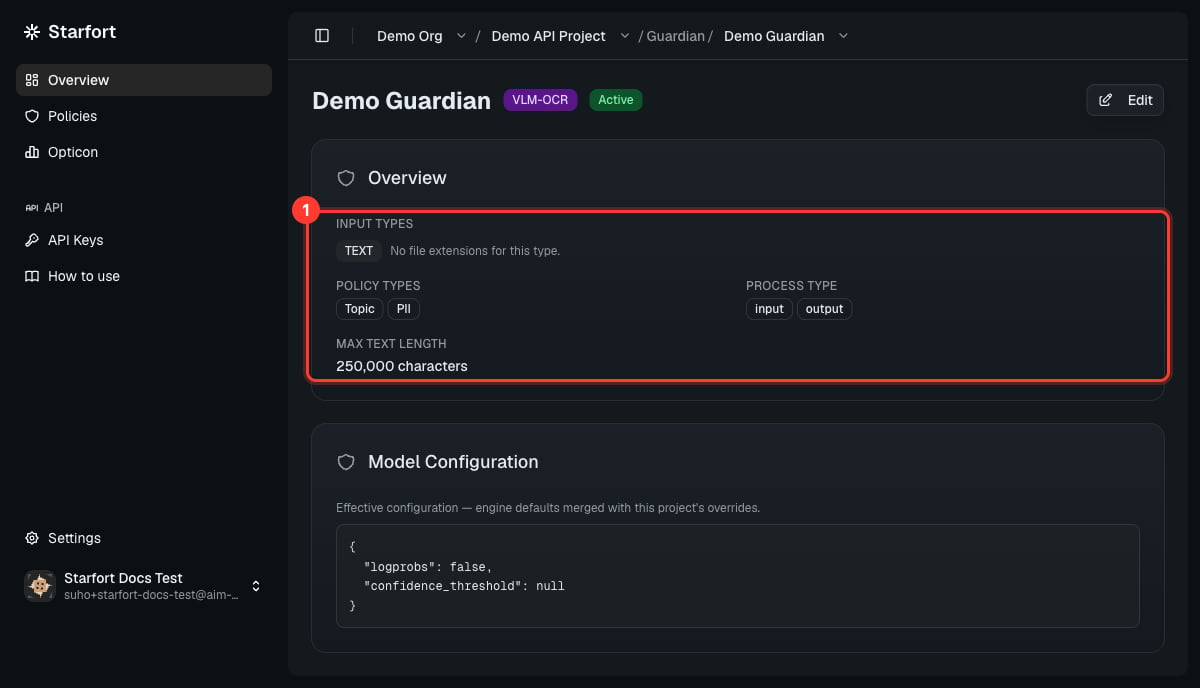
## 생성 후
Guardian의 **Overview**에는 Input Types, 지원되는 **Policy Types**(PII, Topic), **process types**(`input`, `output`), 텍스트 길이 및 파일 크기 제한, 그리고 **Model Configuration**이 표시됩니다.
프리셋의 값은 **생성 시 Guardian으로 복사됩니다** — 사용자가 소유하는 스냅샷입니다. 이후 기반 프리셋의 변경 사항은 Guardian으로 다시 반영되지 않습니다(엔드포인트 바인딩만이 라이브 서비스를 계속 추적합니다). 복사된 제한, 지원 확장자, Model Configuration은 Guardian의 **Settings**에서 프리셋의 범위 내에서 재정의할 수 있지만, **지원되는 Policy Types 집합은 통째로 상속되며 여기에서는 편집할 수 없습니다**. Guardian이 지원하지 않는 형식의 파일은 기본적으로 **차단**됩니다(Settings에서 통과로 전환할 수 있습니다).
**Desktop Agent** 프로젝트에서는 Guardian에 **Control Profile 매핑** 단계도 있습니다: 이 Guardian이 처리할 Dynamic [Control Profile](/ko/v1.2/admin/control-profiles)을 선택합니다(각 매핑에는 on/off 토글이 있으며 기본값은 on). 매핑되지 않은 대상은 Opticon에 로그되지만 Guardian으로 전송되지는 않습니다.
새 Guardian에는 **아직 정책이 없습니다** — [Guard Policy를 할당](/ko/v1.2/admin/author-guard-policy)하기 전까지는 아무것도 마스킹하거나 차단하지 않습니다.
하나의 프로젝트는 각기 다른 프리셋을 사용하는 **여러 Guardian**을 가질 수 있습니다.
## 생성 후
Guardian의 **Overview**에는 Input Types, 지원되는 **Policy Types**(PII, Topic), **process types**(`input`, `output`), 텍스트 길이 및 파일 크기 제한, 그리고 **Model Configuration**이 표시됩니다.
프리셋의 값은 **생성 시 Guardian으로 복사됩니다** — 사용자가 소유하는 스냅샷입니다. 이후 기반 프리셋의 변경 사항은 Guardian으로 다시 반영되지 않습니다(엔드포인트 바인딩만이 라이브 서비스를 계속 추적합니다). 복사된 제한, 지원 확장자, Model Configuration은 Guardian의 **Settings**에서 프리셋의 범위 내에서 재정의할 수 있지만, **지원되는 Policy Types 집합은 통째로 상속되며 여기에서는 편집할 수 없습니다**. Guardian이 지원하지 않는 형식의 파일은 기본적으로 **차단**됩니다(Settings에서 통과로 전환할 수 있습니다).
**Desktop Agent** 프로젝트에서는 Guardian에 **Control Profile 매핑** 단계도 있습니다: 이 Guardian이 처리할 Dynamic [Control Profile](/ko/v1.2/admin/control-profiles)을 선택합니다(각 매핑에는 on/off 토글이 있으며 기본값은 on). 매핑되지 않은 대상은 Opticon에 로그되지만 Guardian으로 전송되지는 않습니다.
새 Guardian에는 **아직 정책이 없습니다** — [Guard Policy를 할당](/ko/v1.2/admin/author-guard-policy)하기 전까지는 아무것도 마스킹하거나 차단하지 않습니다.
 ## 다음
## 다음